> ## Documentation Index
> Fetch the complete documentation index at: https://docs.typewise.app/llms.txt
> Use this file to discover all available pages before exploring further.
# Overview
> Actions let the AI Agent perform tasks in your systems, not just answer questions.
Configure actions to resolve customer issues end-to-end: refund orders, update
records, or trigger workflows in connected systems.
## How actions work
When the AI Agent determines a task needs to be performed, such as refunding an
order or updating a ticket, it checks which actions are available in the current
instructions. For integration and manual actions, that usually means tools you
added to a
[Specialist's instructions](https://platform.typewise.app/specialists).
[System actions](/documentation/actions/system-actions) are built in and can
also be added in global guidelines and channel guidelines.
## Add an action
Go to [Actions](https://platform.typewise.app/action-hub) (sidebar → Actions) and click **Add action**.
 Select the type of action:
* **[AI action](/documentation/actions/ai-actions)**: Executed through an [integration](/documentation/integrations/overview)
* **[Manual action](/documentation/actions/manual-actions)**: Delegated to a human agent
For built-in conversation controls such as close, handoff, or switch to
email, see [System actions](/documentation/actions/system-actions). Those do
not need an Actions hub entry.
Select the type of action:
* **[AI action](/documentation/actions/ai-actions)**: Executed through an [integration](/documentation/integrations/overview)
* **[Manual action](/documentation/actions/manual-actions)**: Delegated to a human agent
For built-in conversation controls such as close, handoff, or switch to
email, see [System actions](/documentation/actions/system-actions). Those do
not need an Actions hub entry.
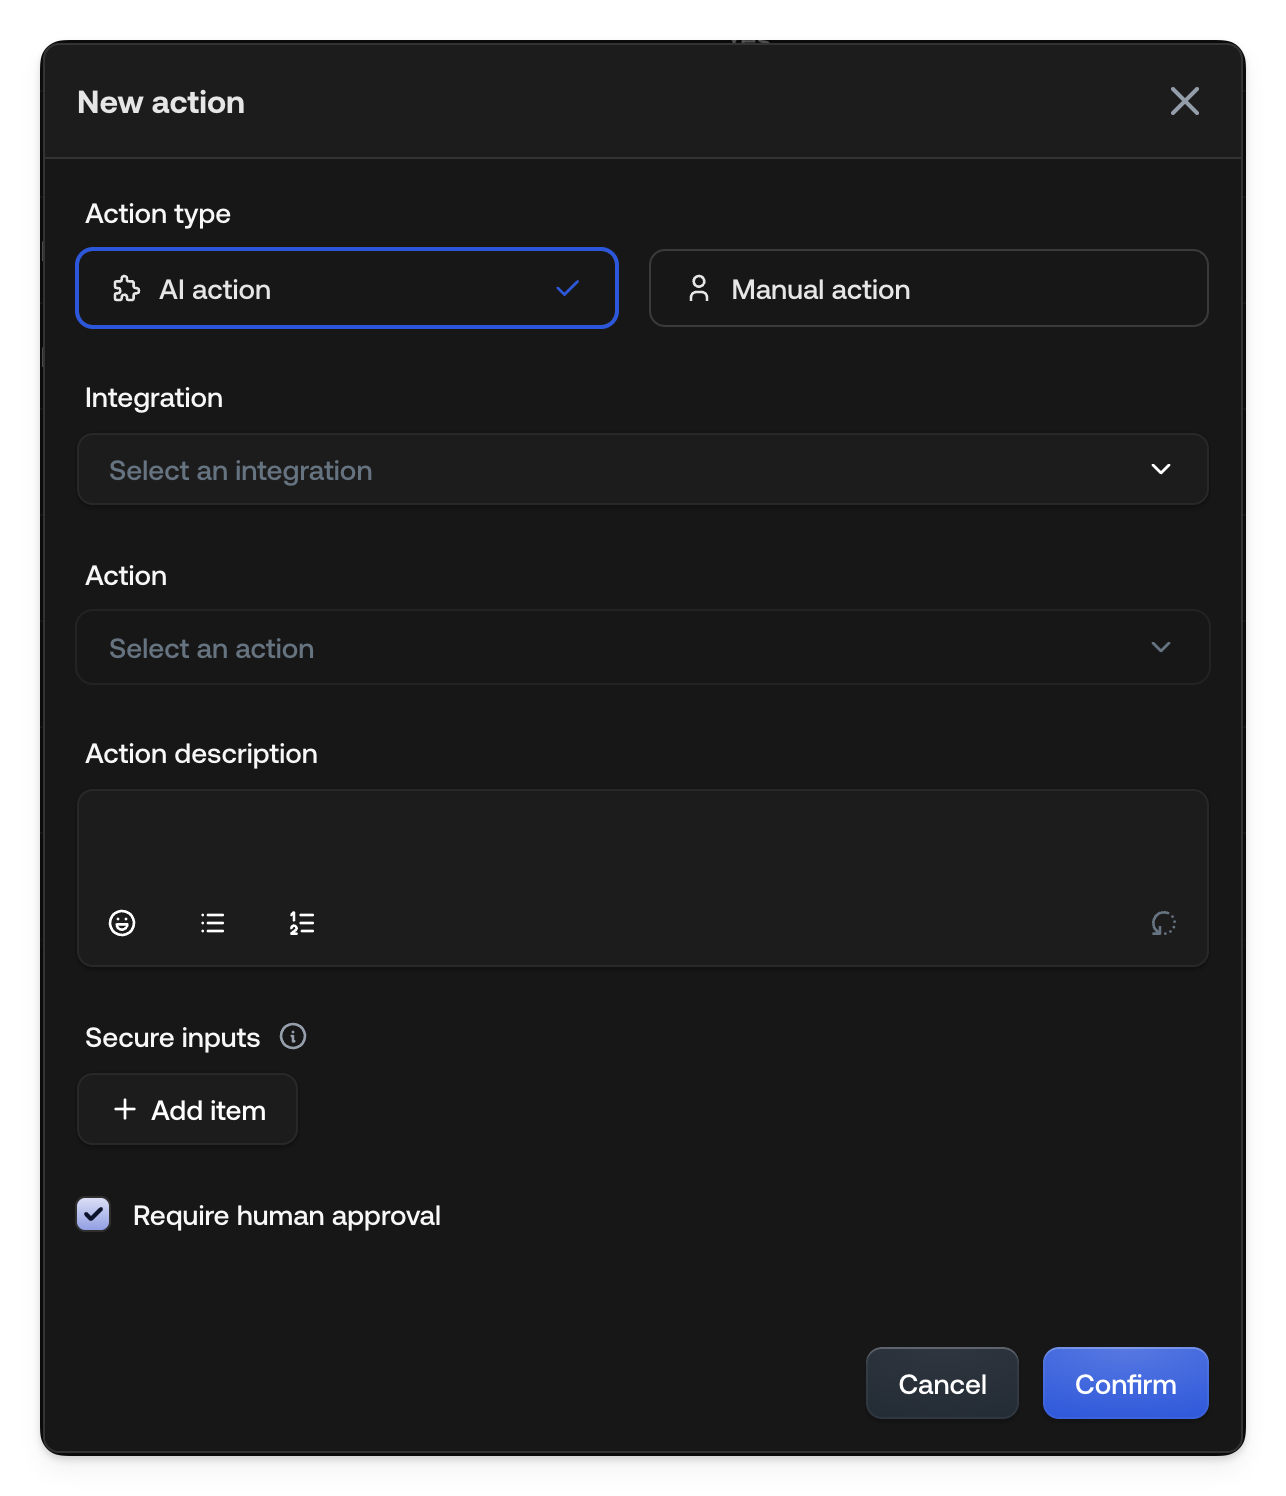 Fill in the required fields:
* **Integration**: The connected system (e.g., Salesforce, your MCP server)
* **Action**: The specific operation from the integration
* **Name**: A readable name for this action instance (shown in the Actions table and to the AI Agent)
* **Action description**: When and how to use this action
* **[Customize inputs](/documentation/settings/context-variables#use-variables-in-actions-and-lookups)**: Per input, pick a source (Auto, Static, or a context variable). Add a **Trusted only** check on variable mappings that need a verified value.
* **Require human approval**: Require confirmation before execution (enabled by default)
Click **Confirm** to save. Then add it to a Specialist:
1. Go to [Specialists](https://platform.typewise.app/specialists) (sidebar → Specialists)
2. Edit the Specialist that should use this action
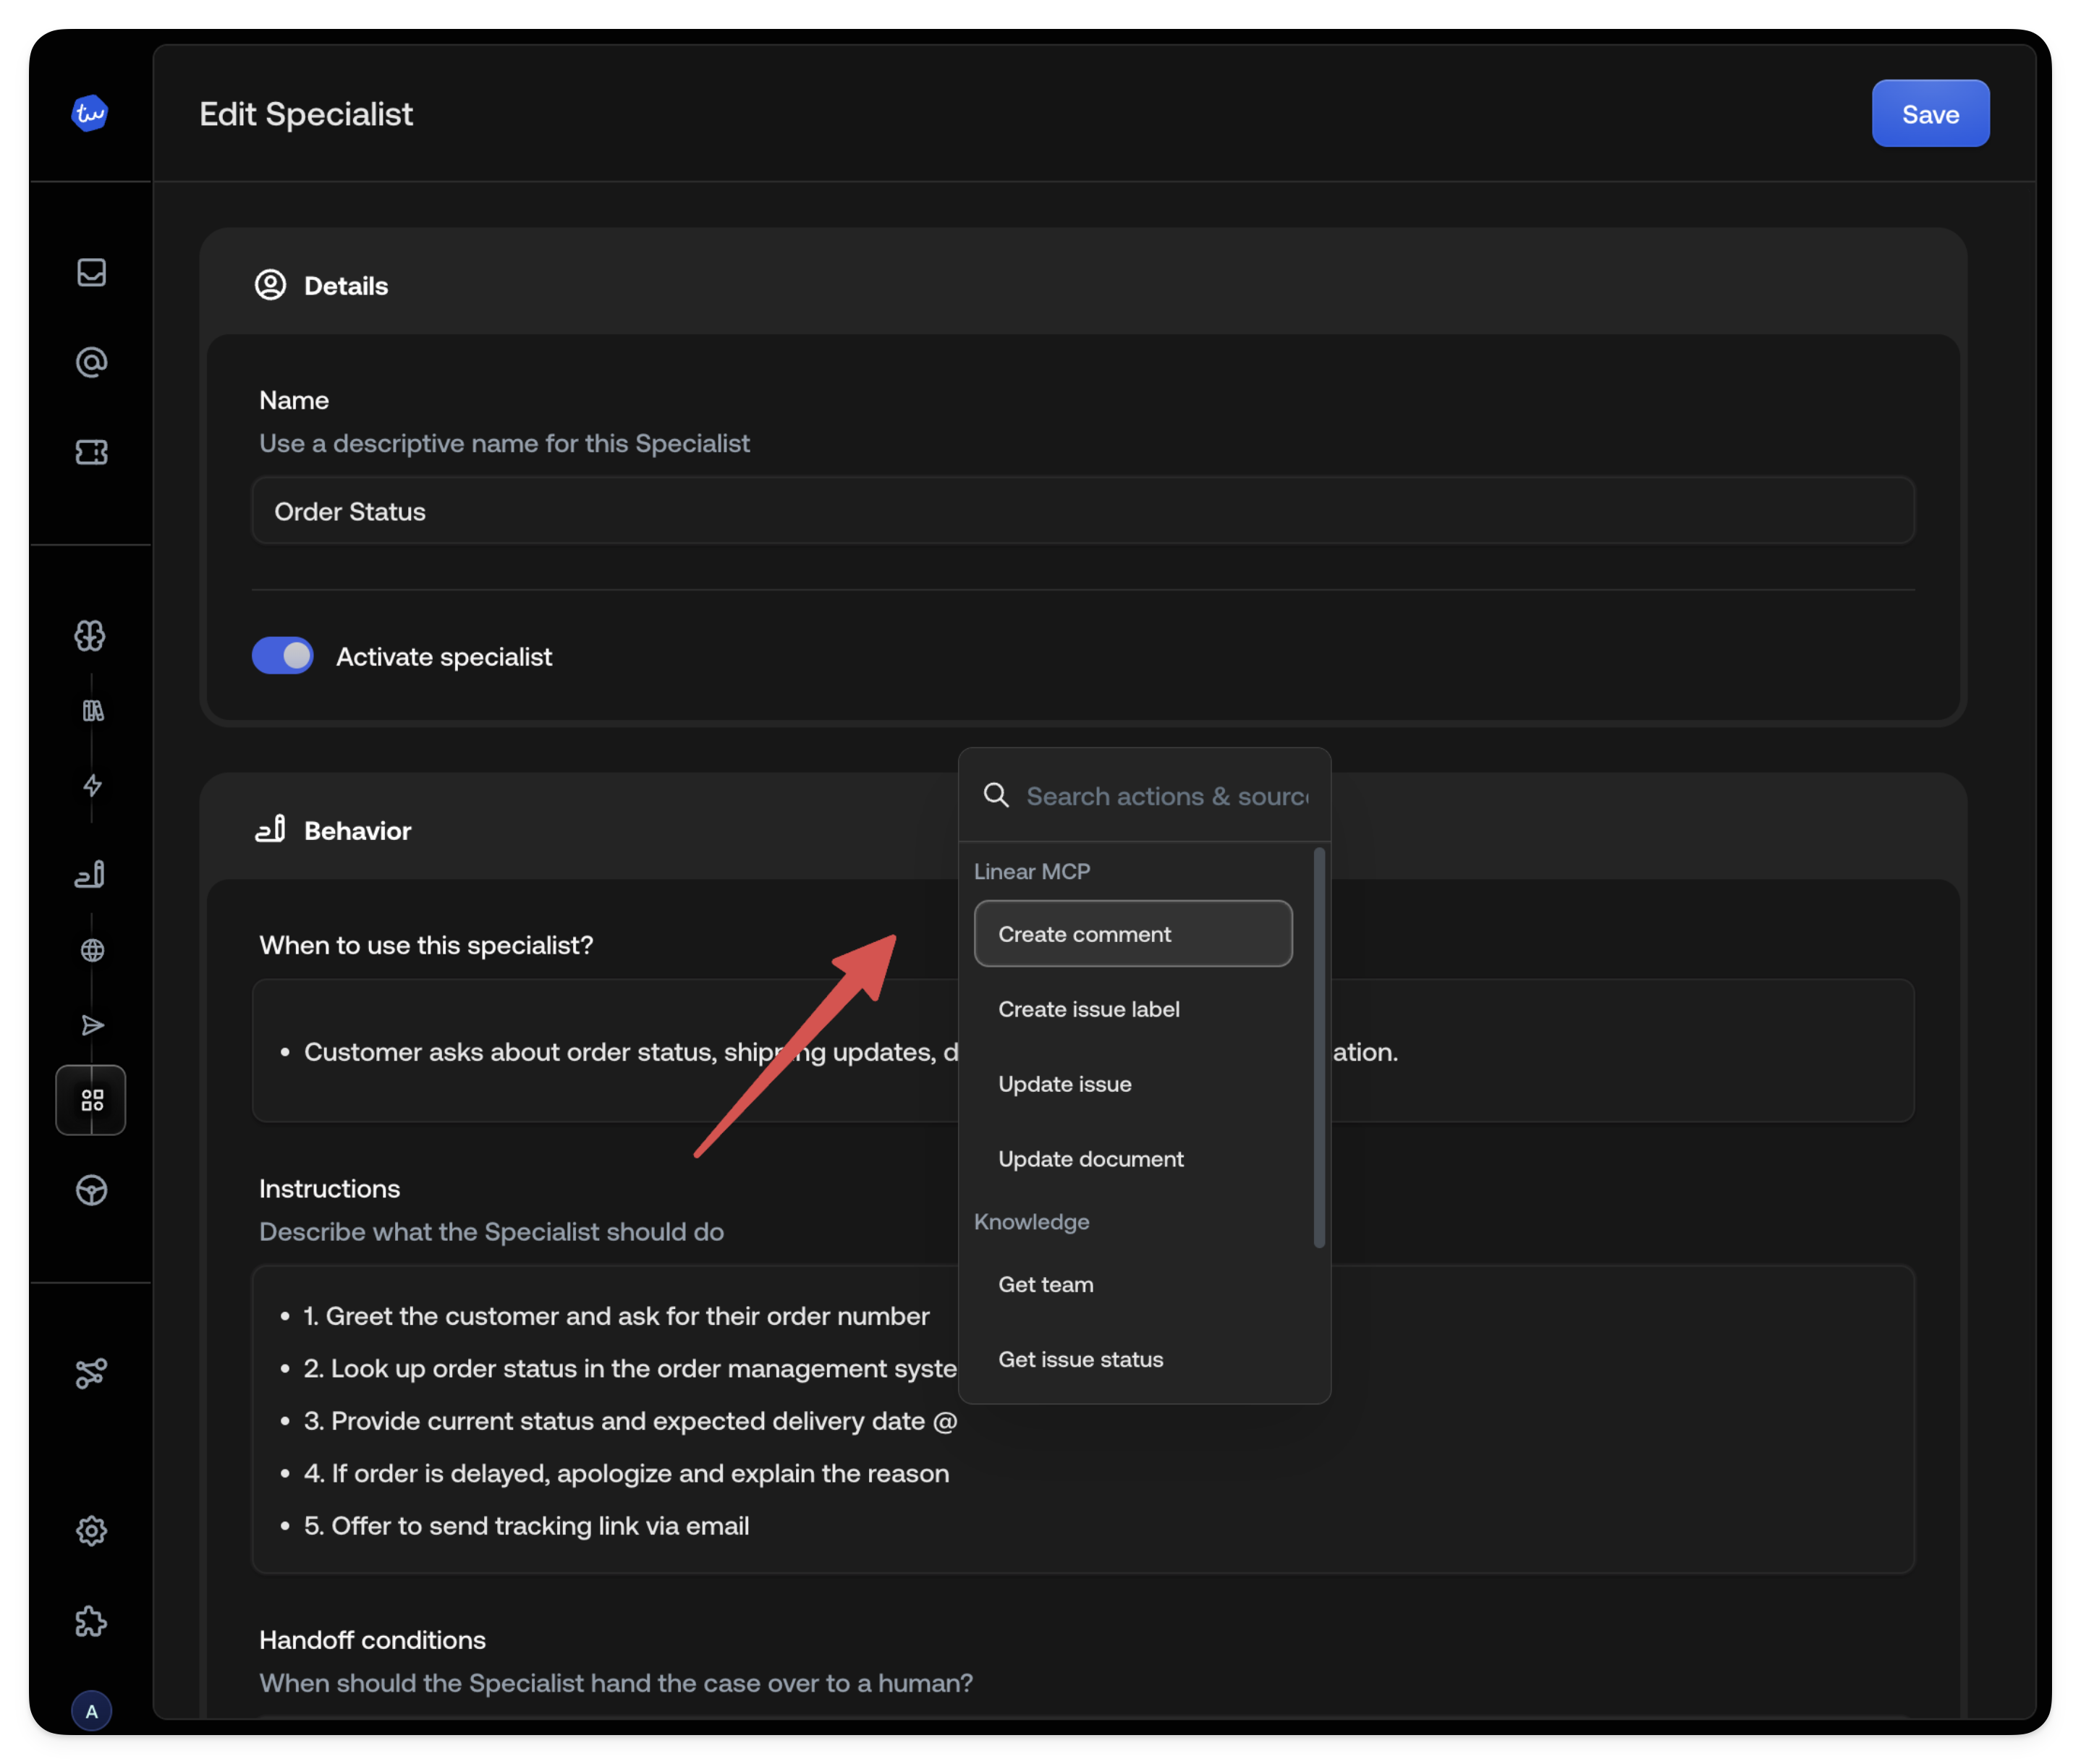
3. In the Instructions field, type `@` to open the tool picker
4. Select your action. It appears as a visual pill in the instructions.
Fill in the required fields:
* **Integration**: The connected system (e.g., Salesforce, your MCP server)
* **Action**: The specific operation from the integration
* **Name**: A readable name for this action instance (shown in the Actions table and to the AI Agent)
* **Action description**: When and how to use this action
* **[Customize inputs](/documentation/settings/context-variables#use-variables-in-actions-and-lookups)**: Per input, pick a source (Auto, Static, or a context variable). Add a **Trusted only** check on variable mappings that need a verified value.
* **Require human approval**: Require confirmation before execution (enabled by default)
Click **Confirm** to save. Then add it to a Specialist:
1. Go to [Specialists](https://platform.typewise.app/specialists) (sidebar → Specialists)
2. Edit the Specialist that should use this action
3. In the Instructions field, type `@` to open the tool picker
4. Select your action. It appears as a visual pill in the instructions.
 ## Reuse the same action multiple times
You can add the same catalog action more than once. Each instance keeps its own
**Name**, description, and input mappings, so the AI Agent can choose the right
variant without guessing hidden values such as queue IDs or sender mailboxes.
When you pick an action that is already configured, the picker shows a warning
with how many other instances already use it. The Actions table shows each
instance under its custom **Name**, not only the catalog tool name.
**Example:** Add `create_case` twice as **Create billing case** and **Create
tech case**, each with a different queue ID set as a static input. Or add
`send_email` twice for `support@` and `billing@`.
Two instances with the same tool, description, and inputs are blocked. A valid
variant needs a unique **Name** and a different description or input mapping.
You do not need a separate upstream integration just to represent different
prefilled variants.
## See also
* [System actions](/documentation/actions/system-actions): Close, hand off,
verify the customer, or switch a conversation to email
* [AI actions](/documentation/actions/ai-actions): Execute through integrations
* [Manual actions](/documentation/actions/manual-actions): Human Agent execution
* [Security & verification](/documentation/actions/security): The trust model
behind input customization
* [Context Variables](/documentation/settings/context-variables): Declare
context variables and customize action inputs
## Reuse the same action multiple times
You can add the same catalog action more than once. Each instance keeps its own
**Name**, description, and input mappings, so the AI Agent can choose the right
variant without guessing hidden values such as queue IDs or sender mailboxes.
When you pick an action that is already configured, the picker shows a warning
with how many other instances already use it. The Actions table shows each
instance under its custom **Name**, not only the catalog tool name.
**Example:** Add `create_case` twice as **Create billing case** and **Create
tech case**, each with a different queue ID set as a static input. Or add
`send_email` twice for `support@` and `billing@`.
Two instances with the same tool, description, and inputs are blocked. A valid
variant needs a unique **Name** and a different description or input mapping.
You do not need a separate upstream integration just to represent different
prefilled variants.
## See also
* [System actions](/documentation/actions/system-actions): Close, hand off,
verify the customer, or switch a conversation to email
* [AI actions](/documentation/actions/ai-actions): Execute through integrations
* [Manual actions](/documentation/actions/manual-actions): Human Agent execution
* [Security & verification](/documentation/actions/security): The trust model
behind input customization
* [Context Variables](/documentation/settings/context-variables): Declare
context variables and customize action inputs