> ## Documentation Index
> Fetch the complete documentation index at: https://docs.typewise.app/llms.txt
> Use this file to discover all available pages before exploring further.
# Composer
> Understanding the composer
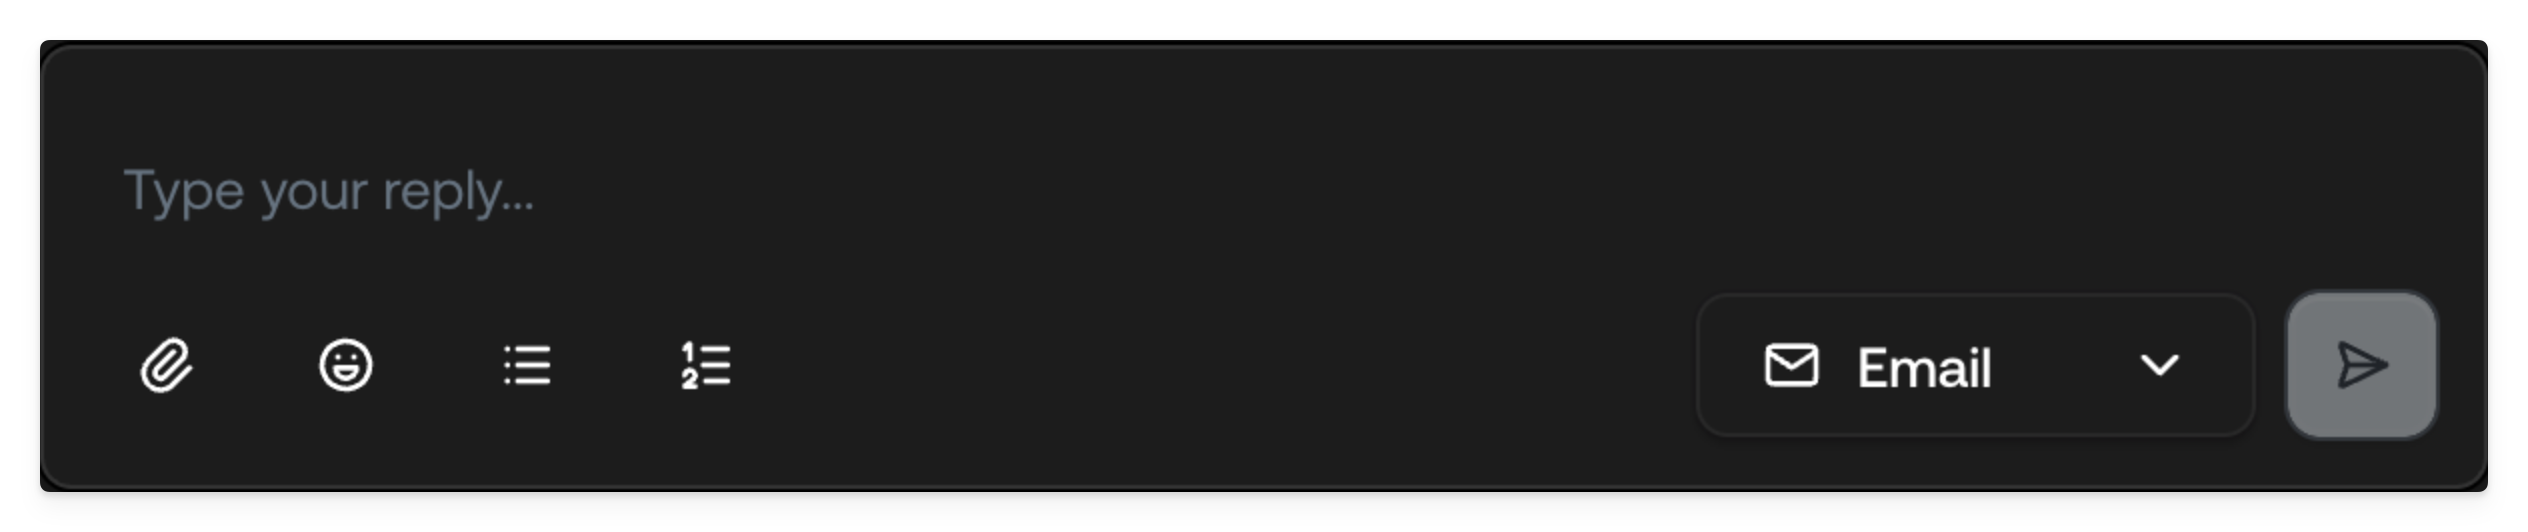
The composer at the bottom of the conversation view is where you compose
responses once you take over a ticket. It provides rich text editing
capabilities, attachment support, and flexible options for managing how and
where your message is sent.
The composer is only available once you've taken over a ticket.
 ***
## Rich text editing
The composer includes a full-featured rich text editor that allows you to format
your messages professionally. The formatting toolbar provides quick access to
common styling options:
* **Bold** and *italic* text for emphasis
* Bulleted and numbered lists for organized information
* Hyperlinks to reference external resources or documentation
* Block quotes for citing previous messages or policies
Use keyboard shortcuts for faster formatting: `Cmd/Ctrl + B` for bold,
`Cmd/Ctrl + I` for italic, and `Cmd/Ctrl + K` to insert a link.
Formatting is preserved when your message is sent, ensuring customers receive
well-structured, readable responses regardless of their email client or chat
interface.
***
## Attachments
For email tickets, you can attach files to your responses by clicking the
attachment icon in the composer toolbar. This is useful for sending:
* Documents (PDFs, Word files, spreadsheets)
* Images and screenshots
* Invoices, receipts, or other supporting materials
Attachments are only available for the **email channel**. Chat tickets do not
support agent-side attachments.
To add an attachment:
Click the attachment icon (paperclip) in the composer toolbar.
Select the file(s) you want to attach from your device. The attached files
will appear below the text editor.
Click the remove button on any attachment to remove it before sending.
Be mindful of attachment file sizes. Large attachments may fail to deliver or
end up in spam filters. Keep individual files under 10MB when possible.
***
## Selecting recipients
When Typewise detects that a ticket originated from a forwarded email,
additional recipient options become available in the composer. This allows you
to control exactly who receives your response.
### How forwarding detection works
If a customer forwards an email thread to your support address, Typewise parses
the original email chain and identifies the original participants. You can then
choose whether to:
* **Reply to the forwarder only**: Send your response only to the person who
forwarded the email to you
* **Reply to original recipients**: Include the original sender and any CC'd
parties from the forwarded thread
* **Customize recipients**: Manually add or remove email addresses before
sending
When forwarding is detected, a recipient selector appears above the composer.
Click on it to expand the full list of available recipients and toggle who
should receive your response.
Always review the recipient list before sending, especially on forwarded
threads. This helps prevent accidentally sending internal information to
unintended parties.
***
## Switching channels
Typewise allows you to switch a ticket's communication channel directly from the
composer. This is particularly useful when a conversation that started in chat
needs to continue over email, for example, when you need to send attachments or
formal documentation.
***
## Rich text editing
The composer includes a full-featured rich text editor that allows you to format
your messages professionally. The formatting toolbar provides quick access to
common styling options:
* **Bold** and *italic* text for emphasis
* Bulleted and numbered lists for organized information
* Hyperlinks to reference external resources or documentation
* Block quotes for citing previous messages or policies
Use keyboard shortcuts for faster formatting: `Cmd/Ctrl + B` for bold,
`Cmd/Ctrl + I` for italic, and `Cmd/Ctrl + K` to insert a link.
Formatting is preserved when your message is sent, ensuring customers receive
well-structured, readable responses regardless of their email client or chat
interface.
***
## Attachments
For email tickets, you can attach files to your responses by clicking the
attachment icon in the composer toolbar. This is useful for sending:
* Documents (PDFs, Word files, spreadsheets)
* Images and screenshots
* Invoices, receipts, or other supporting materials
Attachments are only available for the **email channel**. Chat tickets do not
support agent-side attachments.
To add an attachment:
Click the attachment icon (paperclip) in the composer toolbar.
Select the file(s) you want to attach from your device. The attached files
will appear below the text editor.
Click the remove button on any attachment to remove it before sending.
Be mindful of attachment file sizes. Large attachments may fail to deliver or
end up in spam filters. Keep individual files under 10MB when possible.
***
## Selecting recipients
When Typewise detects that a ticket originated from a forwarded email,
additional recipient options become available in the composer. This allows you
to control exactly who receives your response.
### How forwarding detection works
If a customer forwards an email thread to your support address, Typewise parses
the original email chain and identifies the original participants. You can then
choose whether to:
* **Reply to the forwarder only**: Send your response only to the person who
forwarded the email to you
* **Reply to original recipients**: Include the original sender and any CC'd
parties from the forwarded thread
* **Customize recipients**: Manually add or remove email addresses before
sending
When forwarding is detected, a recipient selector appears above the composer.
Click on it to expand the full list of available recipients and toggle who
should receive your response.
Always review the recipient list before sending, especially on forwarded
threads. This helps prevent accidentally sending internal information to
unintended parties.
***
## Switching channels
Typewise allows you to switch a ticket's communication channel directly from the
composer. This is particularly useful when a conversation that started in chat
needs to continue over email, for example, when you need to send attachments or
formal documentation.
 ### Switching from chat to email
To switch a chat ticket to email:
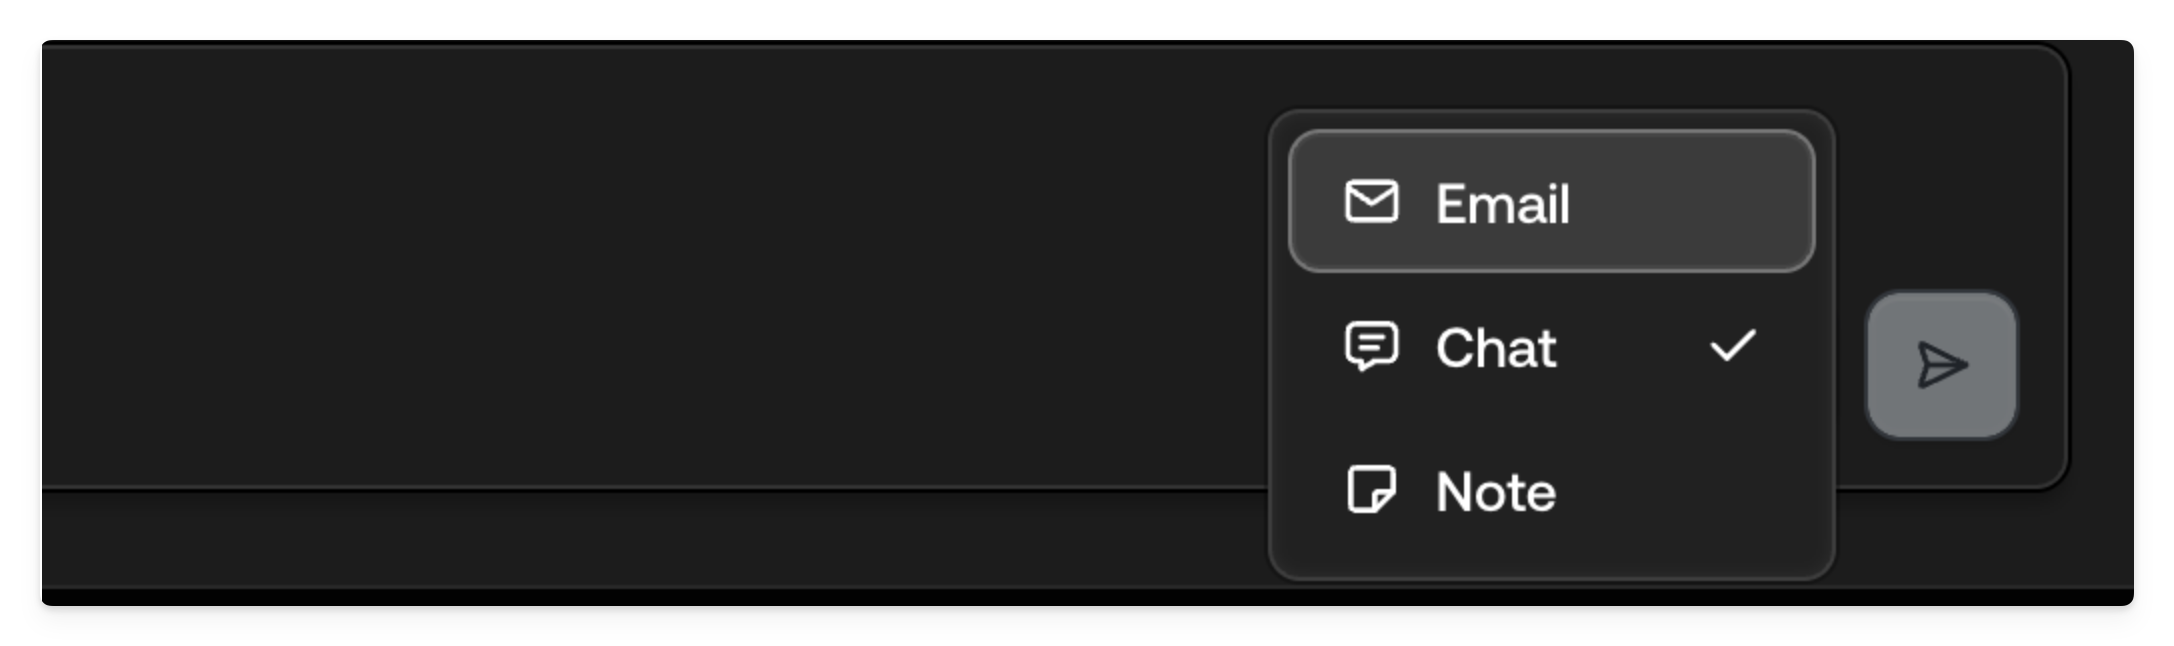
Click on the dropdown button next to the send button in the composer. This
reveals the available message types and channel options.
Choose **Email** from the channel options. The composer will update to show
email-specific features.
If the customer's email address is already known (from their profile or
previous interactions), it will be pre-filled. Otherwise, you'll need to
enter their email address manually.
Write your message using the rich text editor, add any attachments if
needed, and send. The ticket will now continue as an email conversation.
Switching from chat to email is a **one-way operation**. Once a ticket has
been moved to email, it cannot be switched back to chat. Make sure email is
the appropriate channel before switching.
The AI can also move a Chat or WhatsApp conversation to email using the
**Switch to email & handoff** system action. See [System
actions](/documentation/actions/system-actions#switch-to-email-%26-handoff).
***
## Notes mode
The composer can be switched to notes mode for recording internal notes that are
visible only to your team. Notes are essential for collaboration, documentation,
and keeping context when tickets are transferred between agents.
### Switching from chat to email
To switch a chat ticket to email:
Click on the dropdown button next to the send button in the composer. This
reveals the available message types and channel options.
Choose **Email** from the channel options. The composer will update to show
email-specific features.
If the customer's email address is already known (from their profile or
previous interactions), it will be pre-filled. Otherwise, you'll need to
enter their email address manually.
Write your message using the rich text editor, add any attachments if
needed, and send. The ticket will now continue as an email conversation.
Switching from chat to email is a **one-way operation**. Once a ticket has
been moved to email, it cannot be switched back to chat. Make sure email is
the appropriate channel before switching.
The AI can also move a Chat or WhatsApp conversation to email using the
**Switch to email & handoff** system action. See [System
actions](/documentation/actions/system-actions#switch-to-email-%26-handoff).
***
## Notes mode
The composer can be switched to notes mode for recording internal notes that are
visible only to your team. Notes are essential for collaboration, documentation,
and keeping context when tickets are transferred between agents.
 ### Switching to notes mode
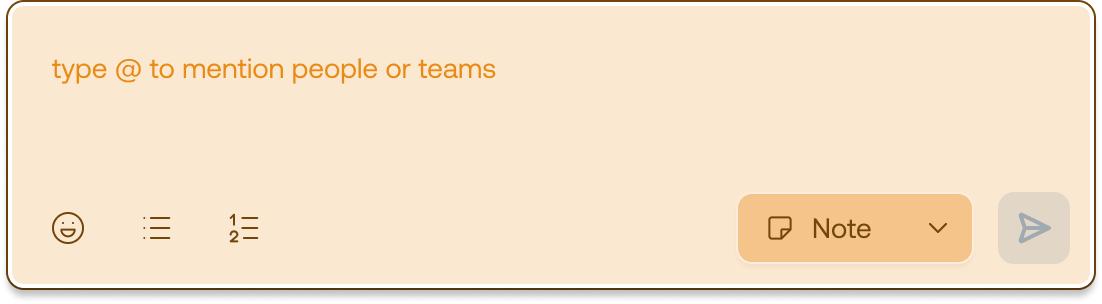
Click on the dropdown button next to the send button in the composer.
Choose **Notes** from the dropdown menu. The composer will change
appearance, typically turning yellow, to clearly indicate you're in notes
mode.
Compose your internal message. Notes support the same rich text formatting
as regular replies.
Click send. The note will appear in the conversation timeline with a
distinct visual style, visible only to agents.
Always double-check that you're in the correct mode before sending. Notes mode
has a distinct visual indicator (yellow background) to help prevent
accidentally sending internal information to customers.
### Mentions in notes
Notes support [@mentions](/documentation/tickets/mentions) for tagging
colleagues and drawing their attention to specific tickets. To mention someone:
While in notes mode, type `@` followed by the person's name.
Select the correct user from the autocomplete dropdown.
Complete your message and send.
The mentioned user will receive a notification and can view the note in their
Mentions tab. They can also reply directly to your note, creating a threaded
conversation for organized internal discussion.
Use mentions to ask questions, request input, or notify colleagues about
important updates, all without leaving the ticket or sending separate
messages.
### Switching to notes mode
Click on the dropdown button next to the send button in the composer.
Choose **Notes** from the dropdown menu. The composer will change
appearance, typically turning yellow, to clearly indicate you're in notes
mode.
Compose your internal message. Notes support the same rich text formatting
as regular replies.
Click send. The note will appear in the conversation timeline with a
distinct visual style, visible only to agents.
Always double-check that you're in the correct mode before sending. Notes mode
has a distinct visual indicator (yellow background) to help prevent
accidentally sending internal information to customers.
### Mentions in notes
Notes support [@mentions](/documentation/tickets/mentions) for tagging
colleagues and drawing their attention to specific tickets. To mention someone:
While in notes mode, type `@` followed by the person's name.
Select the correct user from the autocomplete dropdown.
Complete your message and send.
The mentioned user will receive a notification and can view the note in their
Mentions tab. They can also reply directly to your note, creating a threaded
conversation for organized internal discussion.
Use mentions to ask questions, request input, or notify colleagues about
important updates, all without leaving the ticket or sending separate
messages.