Guidance
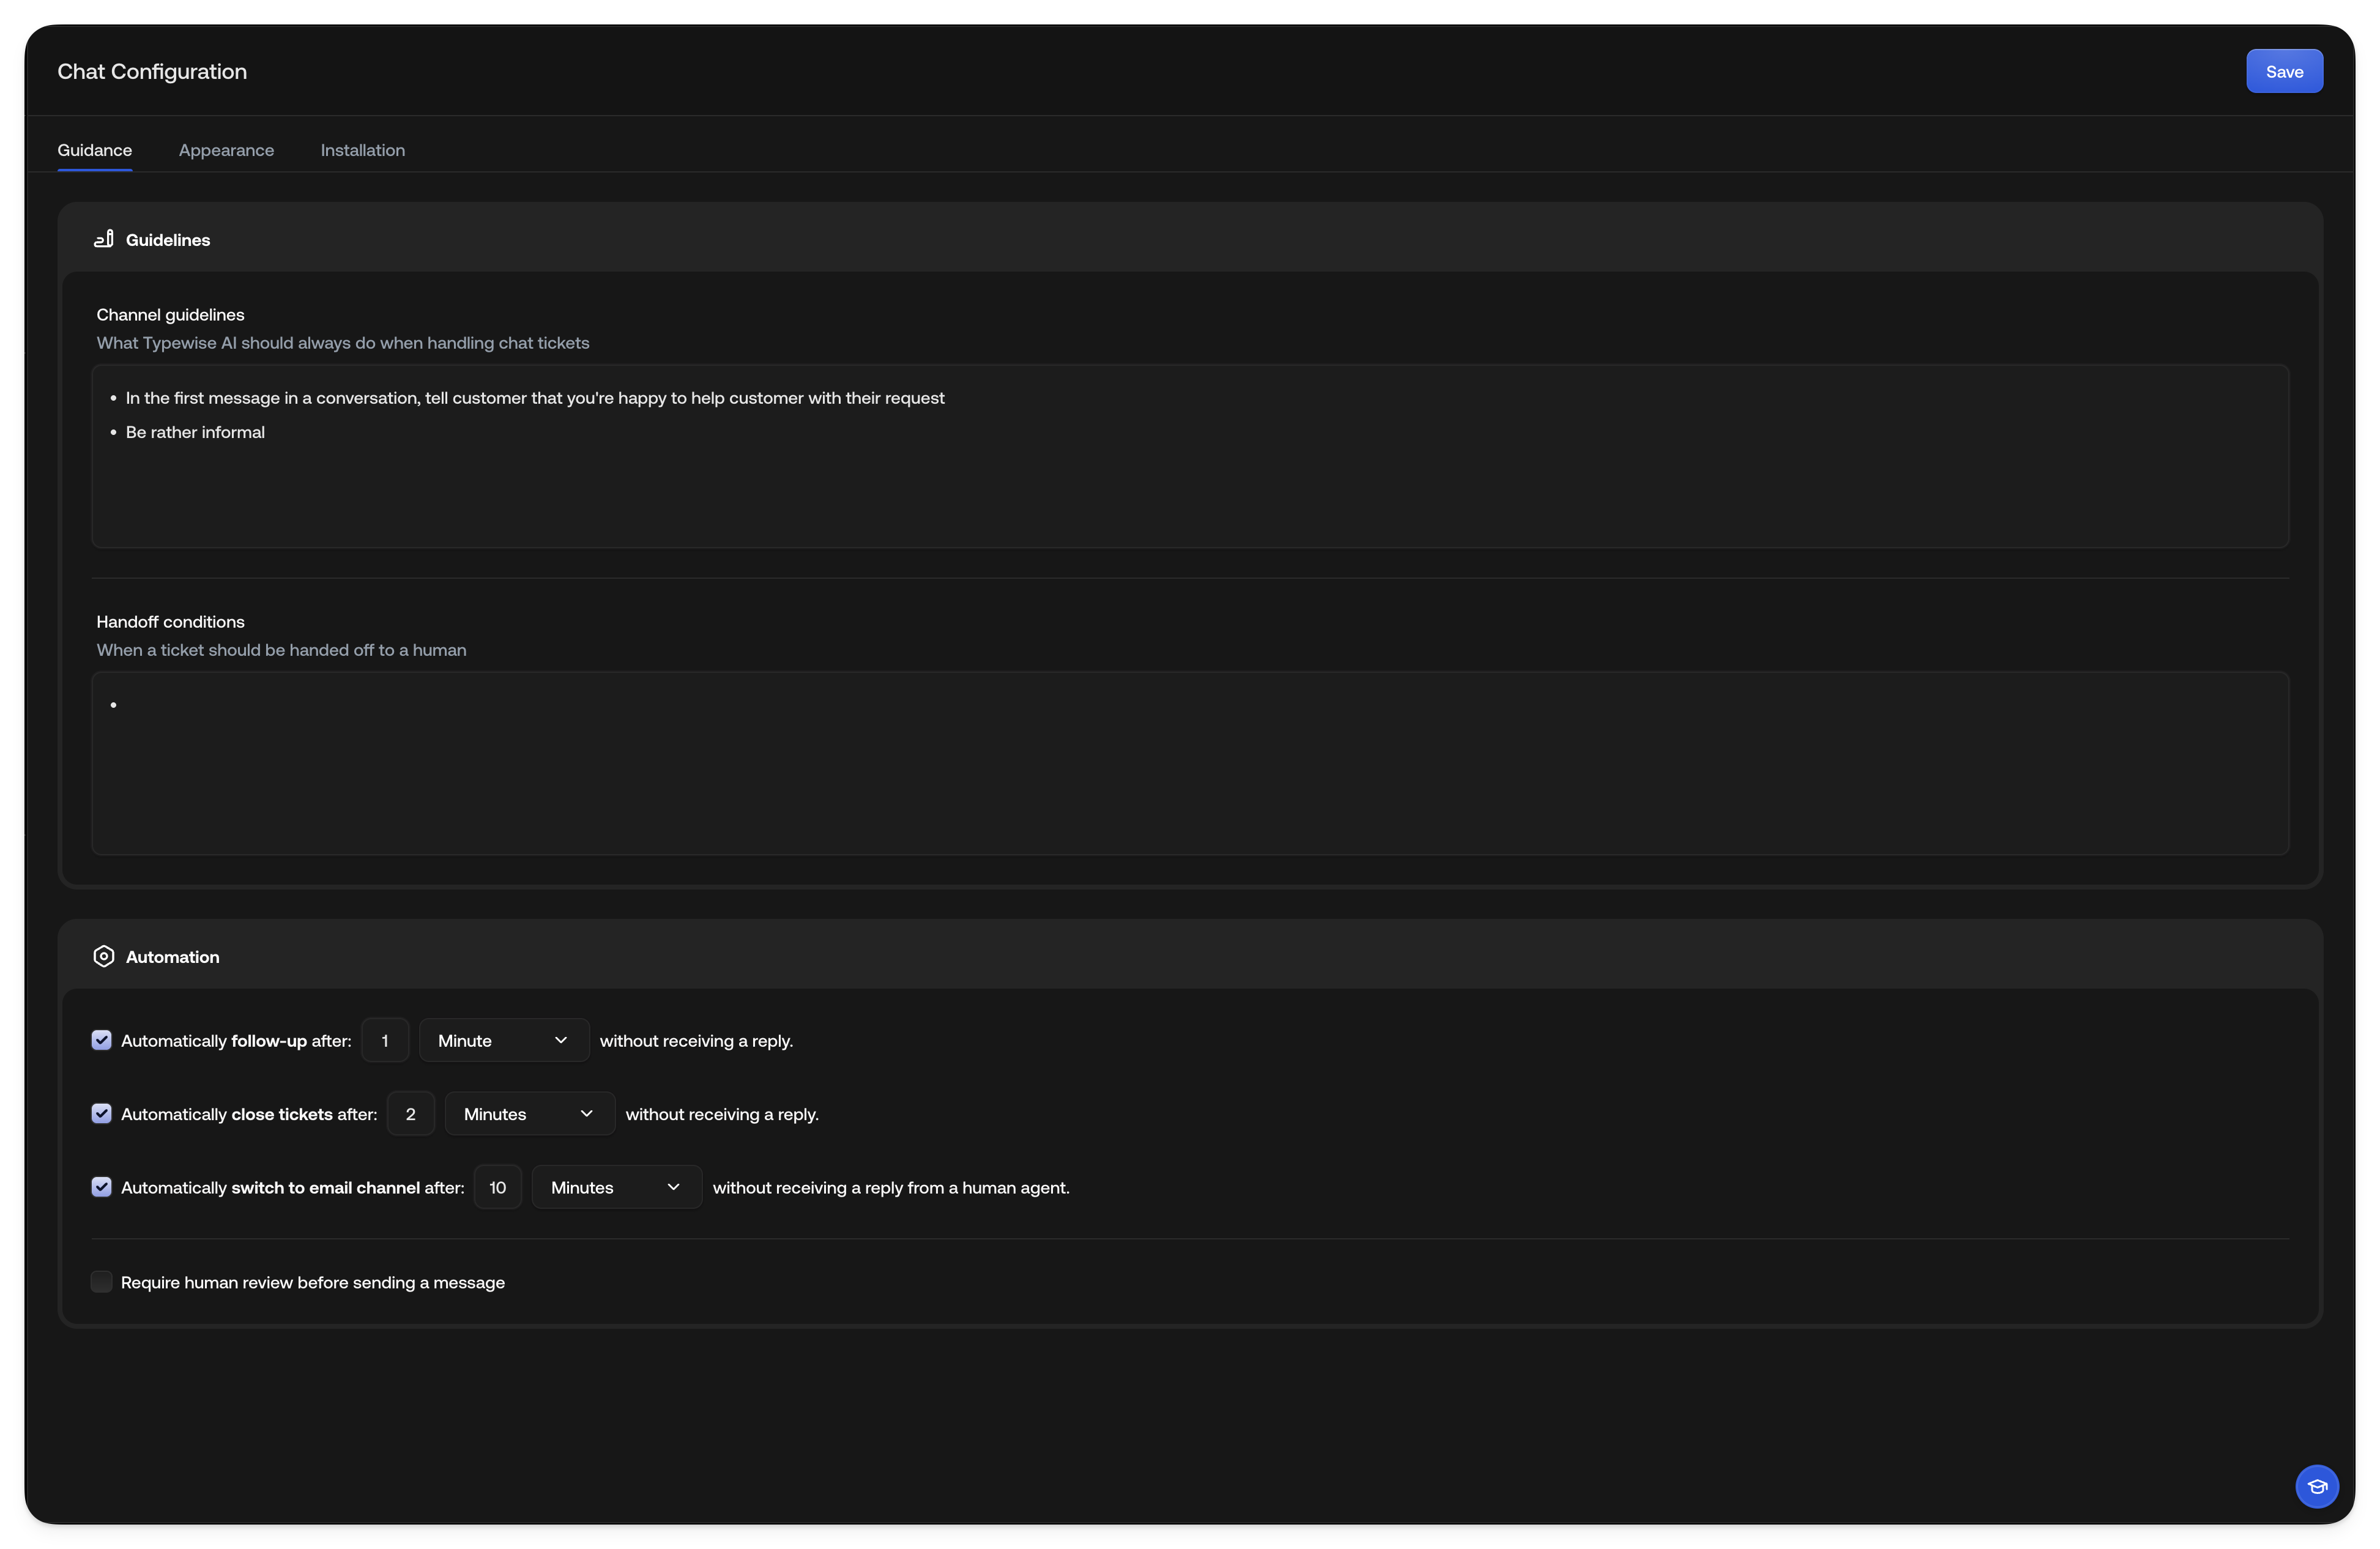
Use the Guidance section to define how Typewise AI should behave during chat interactions and under which conditions a human should take over.Channel Guidelines
Describe what Typewise AI should always do when managing chat tickets. For example:- Greet the end customer politely and introduce itself.
- Keep replies short and conversational.
- Use emojis sparingly, only when appropriate.
- Ask clarifying questions if the end customer’s request isn’t clear.
- Always summarize the resolution before closing the chat.
Handoff Conditions
Define when the chat should be handed over to a Human Agent. Common examples include:- The end customer expresses frustration or asks for a supervisor.
- Sensitive topics like billing, refunds, or legal concerns arise.
Automation
Fine-tune how your chat behaves automatically with timing and review rules.- Automatically follow up after: Send a follow-up message after a specified number of minutes/hours/days without receiving a reply from the end customer. The timer starts after the last customer message. When triggered, Typewise AI generates a contextual follow-up message based on the conversation history, following your channel guidelines and company voice. For example, the AI might send something like: “Hi there! We just wanted to check in and see how things are going.” If auto-close is also enabled, the follow-up message may mention when the chat will close due to inactivity. If “Require human review” is enabled, the follow-up message waits for approval before being sent.
- Automatically close tickets after: Automatically close chat tickets after a specified number of minutes/hours/days without a reply from the end customer. The timer starts from the last customer message. When the timer expires, the ticket is automatically closed and the end customer sees that the conversation was closed due to inactivity. If follow-up is enabled with a shorter timer, the follow-up message will be sent before the ticket closes.
- Automatically switch to email channel after: Switch communication from chat to email after a specified number of minutes/hours/days without a Human Agent reply. This setting only triggers when a handoff to a human agent is pending. When the timer expires, the AI explains that all team members are currently busy and offers to continue the conversation via email. It asks for the end customer’s email address (if not already known), and once confirmed, creates a support ticket with the full conversation history so a Human Agent can follow up via email when available. This ensures end customers aren’t left waiting indefinitely when chat agents are unavailable, and that every inquiry is captured and handled.
- Require human review before sending a message: Enable this option if you want every AI-generated message to be reviewed by a human before being sent to the end customer. When enabled, all AI-generated messages (including follow-ups) go to a pending state. Human Agents see the drafted message in their inbox and can approve, edit, or reject it before sending. This provides oversight for sensitive or important conversations where you want tighter control over what the AI sends.
Appearance
In Appearance, you can configure how your chat widget looks and feels to end customers. Make sure the appearance matches your company’s branding and creates a welcoming experience.What you can configure:
- Color & Branding: Set your brand colors, chat logo, and chat title.
- Widget Details: Adjust widget position, icon type, and shape.
- Greetings: Customize the welcome message to match your brand voice, as well as a list of suggested conversation starters the end customer can choose.

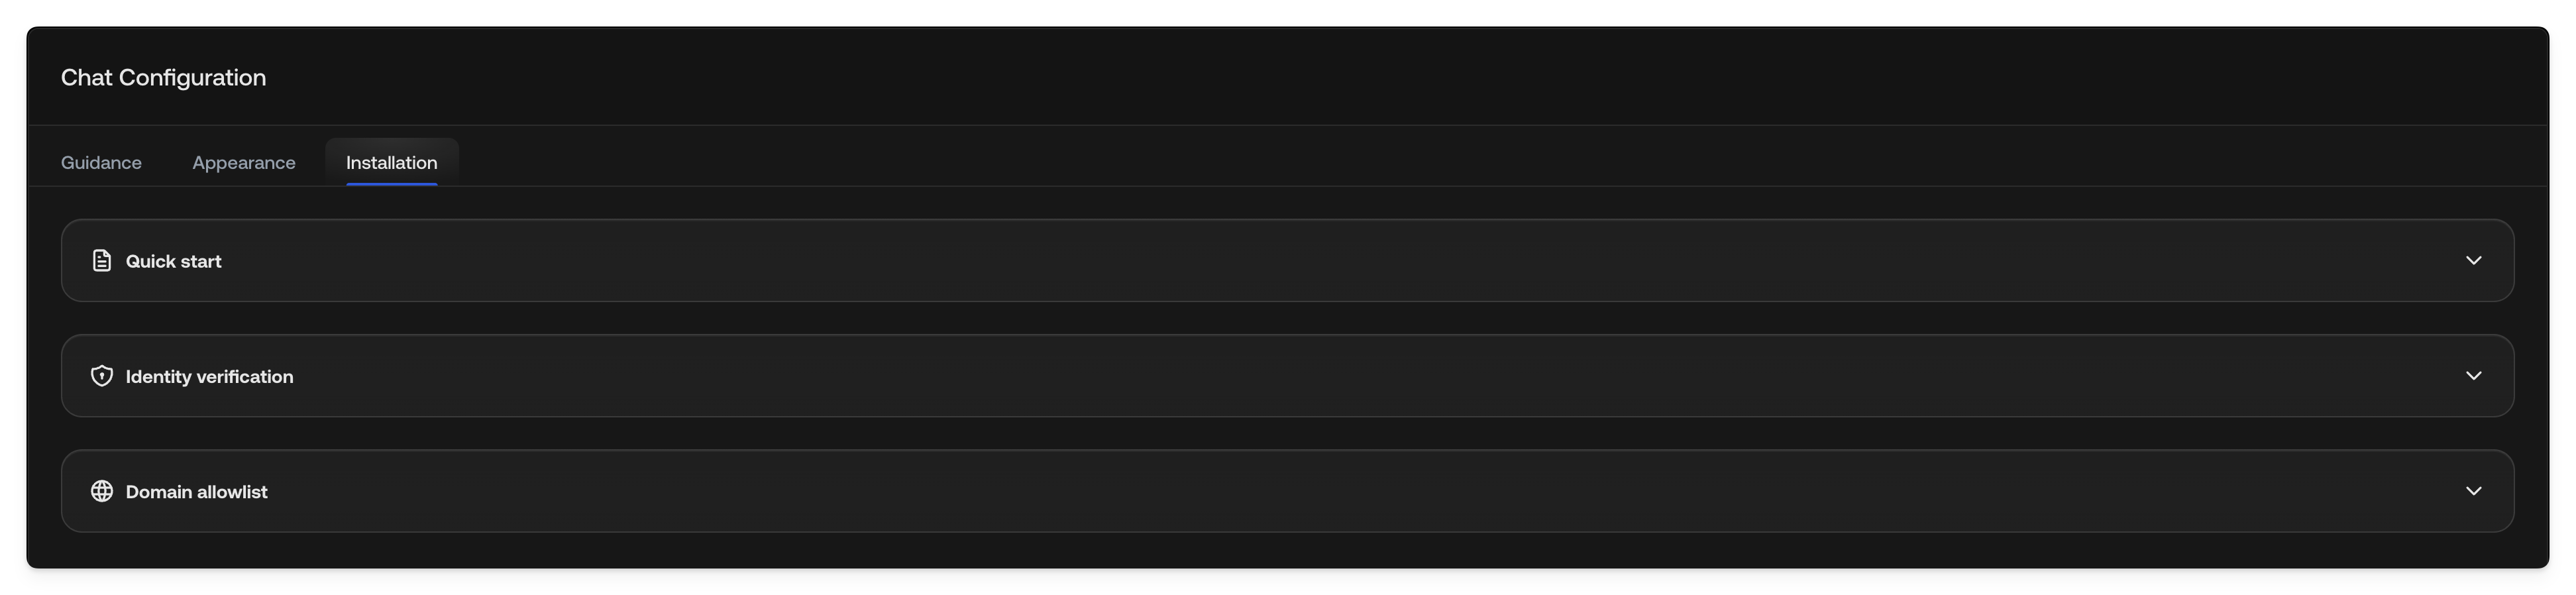
Installation
The Installation section provides everything you need to integrate the chat widget into your website or app. You’ll find:- Quick start: How to embed the chat widget on your site.
- Domain allowlist: A list of approved domains where the chat is allowed to appear. All subdomains of the allowed domains are also allowed. If there are no allowed domains, the chat will not be allowed to appear on any domain.
- Identity verification: Sign the variables your chat widget sends so Typewise treats them as verified on actions and lookups. Required only if a chat action or lookup uses the Trusted only check on any input. See Chat identity verification and Context Variables.
If your website enforces a Content Security Policy, you also need to allow Typewise domains in your CSP headers. See Configure CSP for the chat widget.
See also
- Email Configuration: Configure email channel behavior
- Specialists: Create topic-specific AI behavior
- Company configuration: Set global guidelines
- Configure CSP for the chat widget: Required CSP directives for sites with security headers